You know that feeling, right? You show up for detailing, wait around, and when they hand back your keys the car looks all sparkly—it’s got that just-waxed vibe. Then you check the bill and, oh man, the price makes you do a double-take. Like, really? Was this magic soap?
Nope, it’s not your imagination running wild. Most of us spend hundreds every year paying for car cleanings that, honestly, aren’t that epic. These detailers don’t have some secret ingredient or a spaceship in the back. What they do have is a handful of clever little tricks—simple stuff, not wizardry—and here’s the kicker: it usually costs a lot less than your favorite oat milk latte.
Here’s what most folks don’t realize—the tools and supplies you need, you probably own already. I’m talking stuff straight out of your kitchen and bathroom. Toothpaste? Yup. Dish soap? You bet. That old microfiber rag you shoved in the cabinet last spring? Bingo. Maybe you splurge on a $3 can of compressed air (https://gocarwash.com/vacuum-car-tips). Toss in half an hour on a lazy Sunday, and you’re suddenly that person with the “wow, how do they do it?” car in the parking lot—all without emptying your wallet.
So, I rounded up these six car cleaning hacks (https://www.kbb.com/car-advice/diy-cleaning-hacks/) that genuinely get the job done. No crazy contraptions or steps that require reading the manual twice. Just practical, tested hacks—here’s the menu:
- The sneaky trick that snags all those tiny crumbs and rogue dust bunnies your vacuum misses. (You’ll never look at compressed air the same again.)
- The steaming move for sticky, hard-to-clean spots like cup holders, air vents, and those tight seat seams. (And watch out for the one common water mistake that can backfire big time.)
- The secret sauce for turning sad, brownish tires shiny-black again—without any weird sprays, just a little elbow grease.
- The steering wheel quick-fix for dissolving gross grime (because let’s face it, hands are gross).
- The glass-cleaning method that zaps away streaks so you actually see things at night instead of halos and ghosts on your windshield.
- The spot in your car you literally touch every single drive but almost never think to clean. (Hint: It’s not the door handle.)
Best part? Every single hack is cheap, fast, and comes with smart safety tips to protect your ride—because the only thing more annoying than overpaying for detailing is wrecking your car with a DIY blunder.
Want to start saving some cash and level-up your ride? Grab an old towel and jump in with hack number one. Trust me, your car—and your bank account—are gonna give you a standing ovation.
Trick Number 1: Compressed air blowout
Here’s the truth most Car Cleaning Hacks You Can Do at Home pros won’t tell you about cleaning a car’s interior. They don’t just grab a vacuum and charge in. First, they use compressed air. Seriously, it can change everything. Dirt and crumbs always find their way into those impossible spots—air vents, seat tracks, gaps between the seats and console, under the carpet edges. A vacuum doesn’t even come close to touching all that.
With compressed air, you blast the junk out and finally get it where you can vacuum it up. Start from the top—vents, dash, console, then seats and seat rails, and finish with the carpet. Let gravity help out; all the mess lands on the floor. Open up all the doors so the dust and debris can escape. And if you don’t want crud in your eyes, safety glasses are a good call.
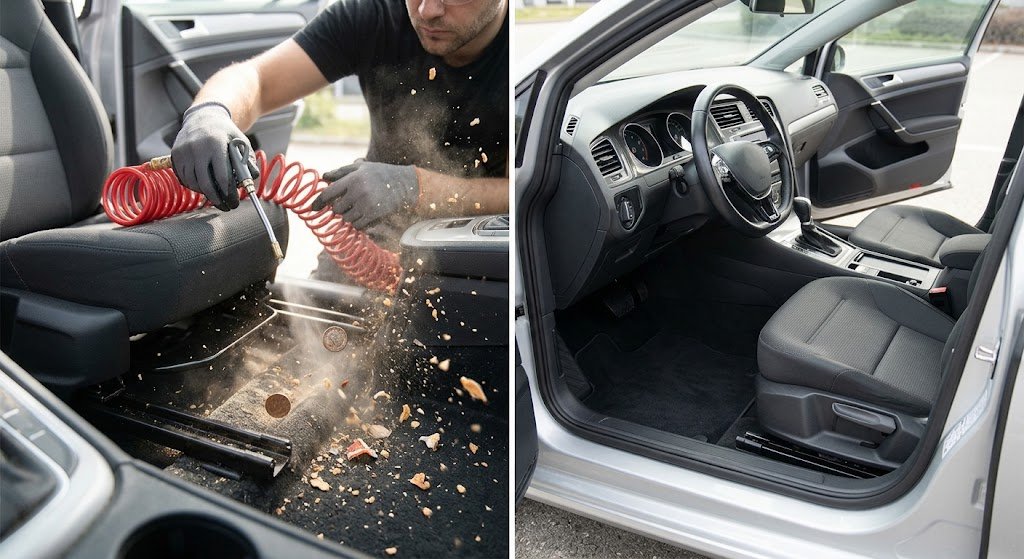
After blowing everything out, grab the vacuum and go from top to bottom. You’ll probably find fries, coins, and crumbs you never knew existed—stuff that’s been lurking for years. If you’re using canned air, keep it upright and use quick blasts to avoid spraying freezing liquid around. Getting the vents clean is huge because you stop all that dust from shooting out next time you turn on the AC.Do you have your own Car Cleaning Hacks You Can Do at Home to share?
When you’re done, your car doesn’t just look cleaner—it smells fresher, too. A can of air costs maybe five bucks, and if you have an air compressor at home, it’s free. Professional detailers charge between $150 and $300 for an interior clean, and blowing out debris with air is always their first move. Now you’re in on the secret.
If this trick saves you a bunch of money or makes you realize you’ve been paying way too much for simple cleaning, hit like and subscribe. Your wallet deserves it. And honestly, there are even bigger detailer hacks out there that can save you thousands—click the next video if you want to know what else they’re not telling you.
Trick Number 2: Distilled water steam cleaning trick
Cup holders crusted with old soda. Air vents stuffed with dust. Seat seams hiding years of crumbs and spills that just won’t budge. Here’s the deal—professional detailers have a magic trick: steam. But they don’t really talk about the most important part. It’s all about what you put in the steamer.
Always go with distilled water. Seriously—never use tap water. Tap’s loaded with minerals, and those minerals leave ugly white spots on your plastic and start clogging your steamer over time. Distilled water? It leaves nothing but pure steam, no residue, nothing hidden.
Grab a handheld steamer, fill it up with distilled water, and attack those cup holders, door pockets, vents, seams, even stubborn carpet stains. Right after you steam, follow up with a microfiber towel and watch the grime wipe away. The heat melts sticky messes, kills the nasty bacteria behind funky smells, and you don’t need any harsh chemicals.
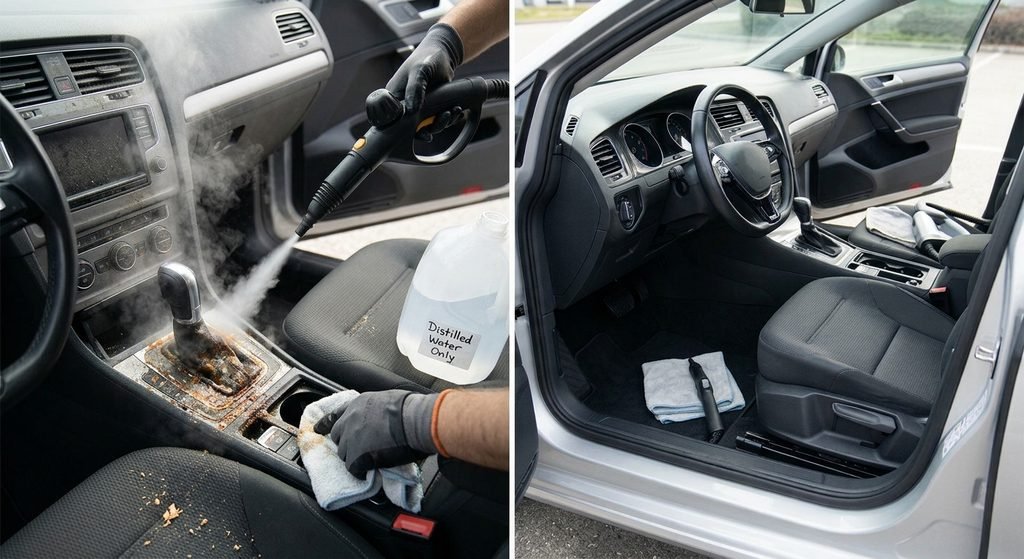
Don’t just sit there blasting away, though—keep the steamer moving, especially near screens or electronics. For more sensitive spots, wrap a microfiber towel around the nozzle so you still get that cleaning power, but without risking any heat damage.How did you like these Car Cleaning Hacks You Can Do at Home?
And here’s the kicker—a gallon of distilled water costs less than two bucks, while detailers charge over $100 for a steam-cleaned inside. One decent handheld steamer pays for itself with just one use. And believe it or not, there’s another surprise coming up.
Trick Number 3: Toothpaste tire scrub
You know that weird brownish tint tires get after a while? That’s called tire blooming. It happens when protective agents inside the rubber work their way out and oxidize right on the surface. Most folks just spray tire shine over it, but that just turns into a greasy, brown mess that never looks truly black.
Detailers have a smarter trick. They know you’ve gotta get rid of the brown before you do anything else. And get this—plain old white toothpaste actually does the trick. Just squeeze some onto a stiff brush, scrub the sidewall in little circles, and you’ll see the brown foam start to lift. That’s all the gunk and old protectant coming right out of the rubber. Keep scrubbing and rinsing until the foam starts to look white instead of brown. That’s when you know the tire’s really clean.
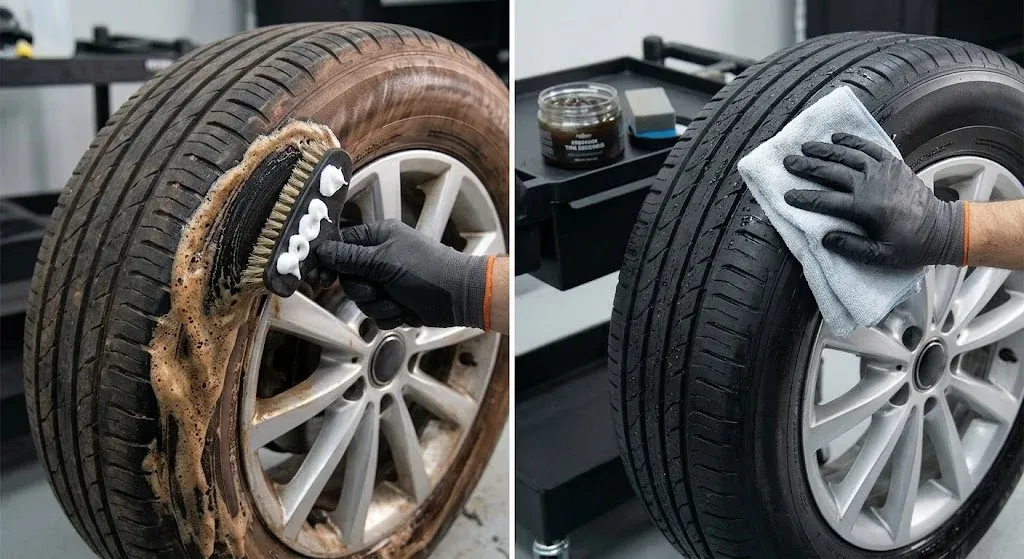
Give it a good rinse with water. Toothpaste has gentle polishing stuff inside that breaks up all that stubborn, oxidized junk without harming the tire. Once the tire’s truly clean, whatever dressing you put on sticks way better and gives you that deep black shine everyone wants—no patchy spots.Which of these Car Cleaning Hacks You Can Do at Home was your favorite?
A tube of toothpaste? About a buck. Professional detailers charge between $30 and $40 for a tire cleaning and dressing. Honestly, who’s really running the scam here? And speaking of shine, the next tip is even better.
Trick Number 2: The Cobra method on windshields and mirrors
smudges, streaks, and that weird foggy gunk right when you need to see most. You blast it with glass cleaner, go at it with a paper towel, maybe curse under your breath… and boom, now it’s even worse. So what’s the trick? Two towels. Yeah, that’s how the pros do it.
Grab a slightly damp waffle weave microfiber towel (https://www.chemicalguys.com/blogs/interior-how-tos/how-to-clean-car-windows-glass-without-streaks) (not that old rag you found in the garage) and go to town on the glass. This one’s for lifting off all the dirty stuff, the grimy residue, or whatever mystery goo’s smeared across your windshield. Right after, use a totally dry glass towel and buff it out till it looks pristine with no streaks—seriously, it’ll look like new. One for cleaning, one for finishing. Simple.Did you already know any of these Car Cleaning Hacks You Can Do at Home?
Now, here’s what almost everyone screws up: direction matters. Take the inside of the glass and wipe it side to side. For the outside, go up and down. If you spot a streak, you’ll know exactly which side to attack because of the way you wiped. Genius, right?
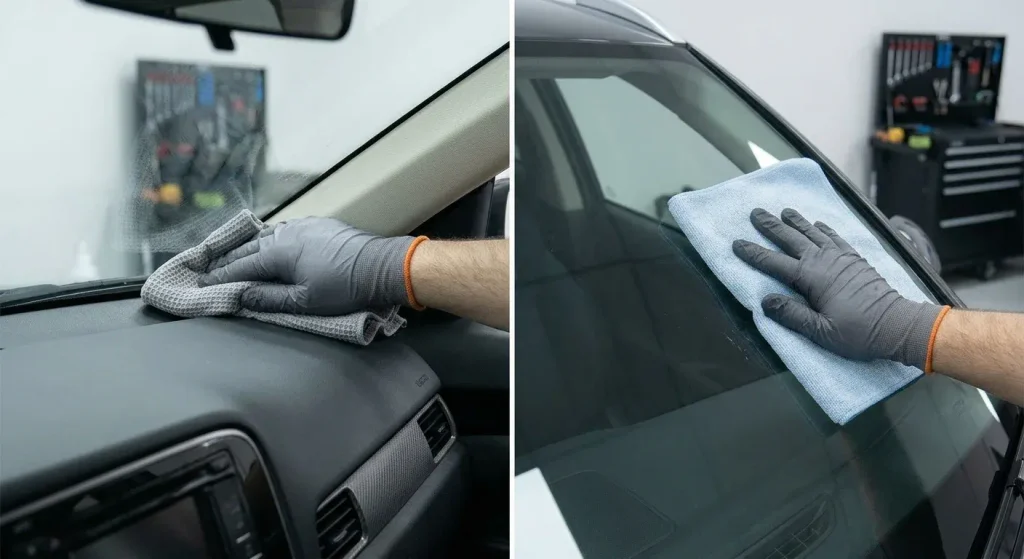
And don’t be a hero trying to clean the glass in direct sunlight. That cleaner evaporates faster than you can blink, and now you’re chasing more streaks. Stay in the shade. Do this trick on your mirrors too—they collect all sorts of weird fingerprints and whatever.
That awkward bottom corner of the windshield, right above the dashboard? Just press the towel in with the back of your hand. That’s the secret move detailers use to reach that spot.
One last thing: Wash your glass towels by themselves. No fabric softener! That stuff leaves a greasy film—you wanted clean glass, not a disco haze. How many of these Car Cleaning Hacks You Can Do at Home have you tried?
You can snag a set of these glass towels (https://carmechan.com/buying-guide/best-way-to-clean-car-windshield/) for under $10 and they’ll last you ages. Compare that to dropping $20+ on someone else cleaning your glass. You’re paying for technique, and now you’ve got it. Next up: saving your paint and ditching whatever’s stuck to it.
Trick Number 1: Dish soap, seat belt clean
So, when’s the last time you actually scrubbed your seat belts? Yeah, probably never, right? Don’t sweat it—it’s not exactly a hot topic at car washes. But think about it for a sec. Every single trip, your seat belt’s sliding over your shirt, your neck, your sweaty arms if you’re coming back from the gym or just roasting in traffic. That thing scoops up all kinds of weirdness: body oils, dirt, coffee splashes, sandwich crumbs. Fast forward a few months, and it’s stiff as cardboard, looking gross, or—God forbid—smelling funky.
Lucky for you, there’s a super easy fix. Yank the seat belt out as far as it’ll go, slap a binder clip right near the reel so it doesn’t snap back, and you’re golden. Grab some warm water, add a splash of dish soap, and grab a soft brush or microfiber cloth. Scrub the whole belt, both sides, don’t be shy. Don’t forget to wipe it down again with a damp cloth so you’re not leaving suds behind. Here’s the big one: leave it out until it’s bone dry. Letting it roll back in wet is basically asking for mold to party in your car.Will you try these Car Cleaning Hacks You Can Do at Home today?
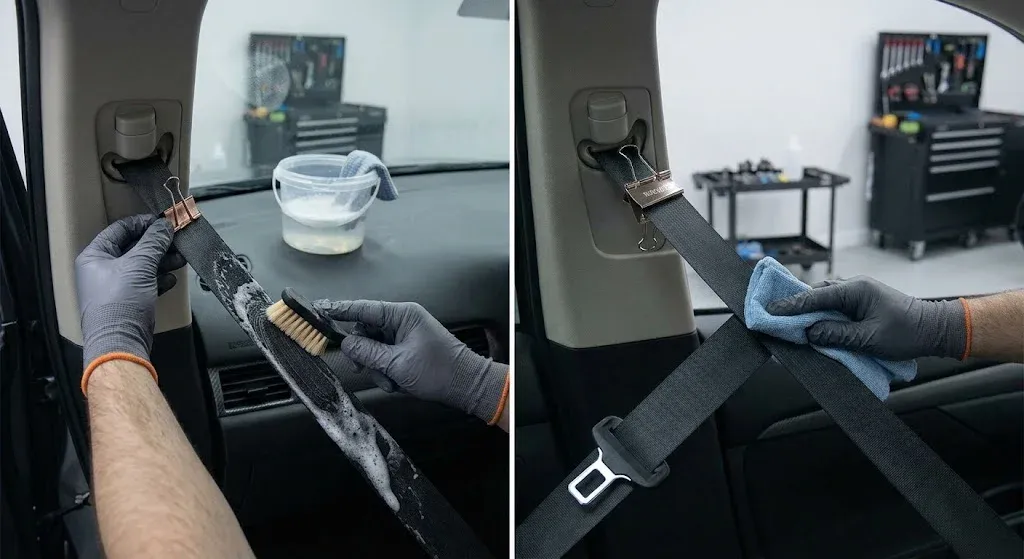
Bleach? Nah, forget it. Harsh cleaners will mess up the fibers and, honestly, you don’t want to risk your seat belt snapping when you actually need it. Basic dish soap is the MVP—safe, cheap, and doesn’t ruin anything. Might as well wipe off the buckle and latch plate while you’re at it. Everyone touches those and—trust me—they get grimy fast.
You’ll notice the belt slides in way smoother since all that junk is outta there. The whole cleaning gig costs maybe ten bucks. Pro detailers do this as part of their fancy packages that can cost a couple hundred—so you’re basically hacking the system and getting your belts back to day-one status.
Before I drop the next batch of tips, throw a like my way, yeah? We spend ages digging up these hacks, and a little love helps us do more. Ready? Buckle up, because the good stuff’s just getting started.
Frequently Asked Questions
How often should I clean my car’s interior?
Most folks do well with a deep clean every two or three months. In between, just wipe down your steering wheel, windows, and vents once a month to keep everything feeling fresh.
Do I really need a steamer?
Nope. For everyday grime, a damp microfiber cloth and a soft brush work just fine. A steamer just helps if you’re dealing with goo that won’t budge.
Is it safe to clean leather seats this way?
Be careful with leather. Always test a small spot first. Use mild cleaners and a conditioner, since heat or anything rough can ruin the material. Double-check your owner’s manual if you’re not sure.
Can DIY replace a pro detail?
Not every time. Big messes—think stained carpets, stubborn odors, mold, scratches, or anything protective—still need a professional touch. These tricks are best for everyday cleaning and maintenance.
Which hack has the biggest impact?
For most people, Hack 1 wins because it grabs dirt your vacuum can’t reach. Hack 5 is close behind—nothing changes the feel of your car faster than crystal-clear glass, especially at night.
Is it safe to clean seat belts at home?
Yes—just use gentle soap and water, let the belt dry completely while it’s stretched out, and steer clear of bleach, heat, or harsh chemicals. If a belt looks frayed or worn out, get it replaced.
A clean car doesn’t mean throwing money at it. It’s more about following the right steps, using a little care with the materials, and actually paying attention to the safety stuff.
If you do one single thing this weekend, just try Hack 1. Blasting out the hidden dust pretty much makes everything else way less of a hassle, and, honestly, it’s the biggest game-changer you’ll see right away. After that, just keep chipping away at the rest when you have the time.
Have you given any of these a shot yet? Drop a comment: Which hack are you trying first? And hey, what’s the strangest thing you’ve ever found in your car? I need some good stories.
The information in this post is for general educational purposes only and is not professional automotive or safety advice.
Test first. Cleaning products and techniques affect materials differently depending on your vehicle’s make, model, age and condition. Always test on a small hidden area first and follow your owner’s manual and the product instructions.
Safety-related parts. Seat belts, tires, glass and airbag components affect safety. If a seat belt is frayed, damaged or not retracting properly, if tires are worn or damaged, or if you are unsure about a method, consult a qualified professional. Do not apply liquids near airbag components.
Equipment safety. Use safety glasses with compressed air and only in a ventilated area. Never inhale it. Be careful with hot steam and hot surfaces, and never mix cleaning chemicals.
Use at your own risk. The author and this website are not liable for any damage, injury or loss resulting from the use of this information. Product types mentioned are for illustration only. This post contains no paid promotion unless clearly stated.
Last updated: 10/22/2026